Check out our video tutorial here: https://youtu.be/l_pqWTq9yys?si=Eo1nbcP3YRaHAKWZ
First up, open the box. Here are the contents:
- Complete swing
- Bracket for your vehicle
- Square tube
- Small round tube and small rectangle plate
- Edge trim
- Ubolt catch
FIRST THINGS FIRST:
Measure the height of the deck of your bumper, passenger side. We recommend painting or powdering the swing and bracket first too.
START INSTALL
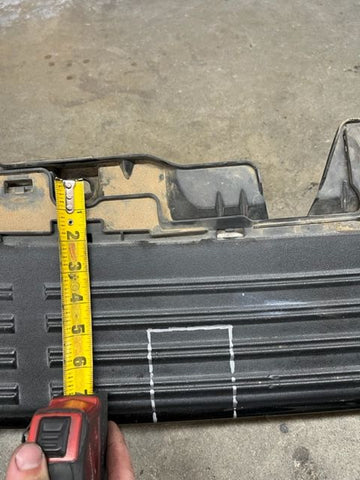
1. Remove bumper: generally 3 bolts on each mudflap area, 5 along the middle at the back, 4 underneath, and 1 near taillights, see pictures below


Some vehicles will have wiring for sensors, be sure to unplug them, remove bumper and foam.

2. Clean Frame: Clean the passenger side of the frame all the way to the end.

3. Weld on frame plate: Either a 3” square or for newer vehicles square with a bell shape cutout (gx460/5th gen 4runner). It should be about ⅜” forward from the body mount weld.
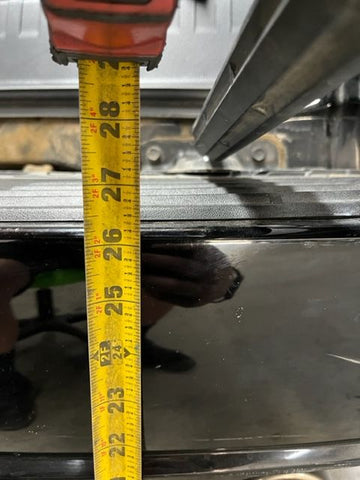
4. Take the measurement: of the bumper height (27” for example and add 3.25” = 30.25”, that is where the top of you bracket should be.
5. Place bracket against frame: Center it on the plate and adjust height to match the number you got for the top of the bracket.


6. Place the bolt in the holes: This will help level the bracket with the frame (eyeball is good), then weld the bracket on, then the gusset.
7. Allow to cool: then put the carrier (with spacer) into the bracket and tighten the hinge bolt. (1-⅛ socket/wrench). The carrier should be slightly above level - higher in the center-. If not, remove carrier and adjust the bottom heim - clockwise to lower the center and counter clockwise to raise the center. Always tighten the hinge bolt before you put a tire on!
8. Put the tire on: tighten lug nuts lightly.


9. Once the tire carrier sits slightly above level, it is time to work on the landing pad.
10. Close the swing until its straight with the frame, look from the driver side of the vehicle.


11. Hold the square tube on the corner of the frame with the top corner even with the drop pin (pic 1)
12. Mark horizontal and vertical lines as shown and cut (pic 1)
13. Hold cut square tube on frame and on the other side mark parallel with the bottom of the swing about ⅜”-½’ lower (pic 2) and cut (pic 3)


14. Clean area where the pad will mount, close swing
15. Slide small round tube on pin and tack to square tube first
16. Tack square tube to frame and make sure the pin is in the center of the round tube still ( tap into place if not) and add more tacks
17. Tack the landing pad plate to the top ensuring it is flat and that you have ¼’ gap between the pad and the swing


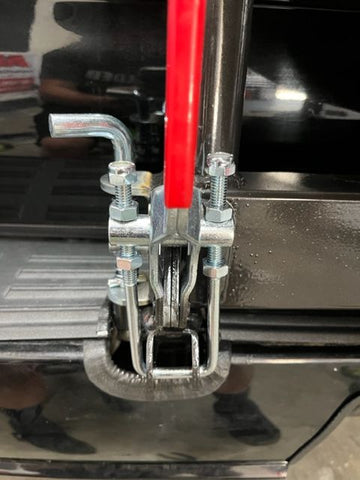
18. Hang the ubolt catch from the ubolt on the swing to help center/alignment and make the top level with the pad.
19. WARNING!!!!!! Ubolt needs to be perfectly vertical, you may need to adjust its placement. On side opening gates (gx460/470) ensure you can open the door. Fully weld.


20. Now we will use bumper bolt holes to plan out the cuts in the plastic for the pad and for the bracket - The bracket side cut must be extended in towards the cab on gxs or else the swing will not close (picture 6 on next page)
21. Paint all bare metal when cool and apply edge trim to bumper cuts
22. 4th Gen 4runners/GX460s: bend filler plate to fit (pic 5 next page)


23. Reinstall bumper after paint is dry, install all bolts
24. Bumper filler plates should be welded on and painted now
25. Bolt on swing with heim spacer, tighten bolt, and install tire.
26. Drill license plate holes to 3/8 “ install license plate
27. Close the swingout and drop the pin into its tube
28. Now it is time to adjust the latch


29. Tighten the middle nuts (clockwise) evenly until there is almost too much resistance to latch - tighter is better than loose
30. (Counterclockwise): tighten the bottom nuts up against the bar
31. Tighten the top nuts/nylocks clockwise down and ensure it feels good, the swing should be pulled snugly down onto the landing pad.
32. Tighten the heim jam nuts (1-⅛ wrench) as tight as possible, you may need to use a tool to keep the heims from spinning
33. Done!